Discord is a popular chat platform used mainly by gamers and people. It allows you to correspond with friends, connect to servers where different topics are discussed, and also chat with friends while playing.
Discord contains a lot of useful settings and features, some visible and some hidden in all kinds of submenus and to get to them you have to make a little effort. So we decided to pick up the gauntlet and collect for you the most useful tips and tricks we have found, which we are sure you will be happy to discover and use.
Convert emoticons to emojis
Are you tired of Discord automatically turning the emoticons (faces) you send in emoji messages? Do you want the characters of the emoticon (face) to remain exactly as you typed them? Do not worry, Discord allows you to turn off the automatic conversion of emoticons to emojis.
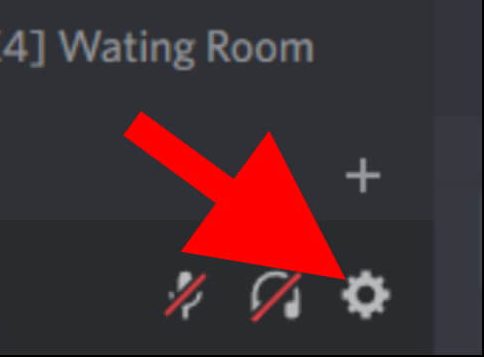
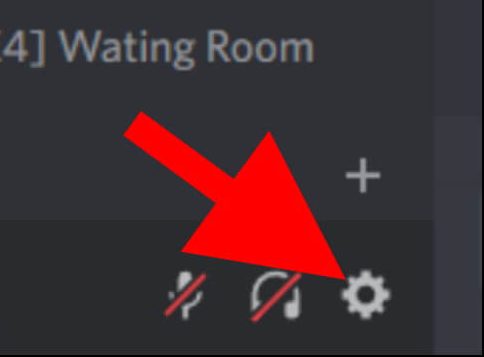
Enter Discord. Click the gear (User Settings) that appears in the lower right corner of the window.
Note: All screenshots listed in this guide were taken from Discord’s web interface.
In the USER SETTINGS window, click on the “Text & Images” option in the menu that appears on the left side of the window. Next, disable the “Automatically convert emoticons in your messages to emoji” option.
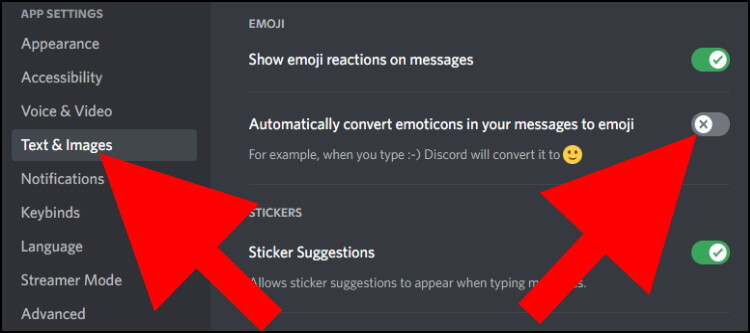
From now on, Discord will no longer perform automatic conversion and the characters you type will not become emojis.
Keyboard Shortcuts
Want to enjoy much better and more efficient use of Discord? So you must be familiar with the keyboard shortcuts that will allow you to activate the most useful features on the platform by pressing just two keys.
Press and hold the “Ctrl” key and then press the key marked “/”. Now, a window will pop up showing all the keyboard shortcuts available in Discord.
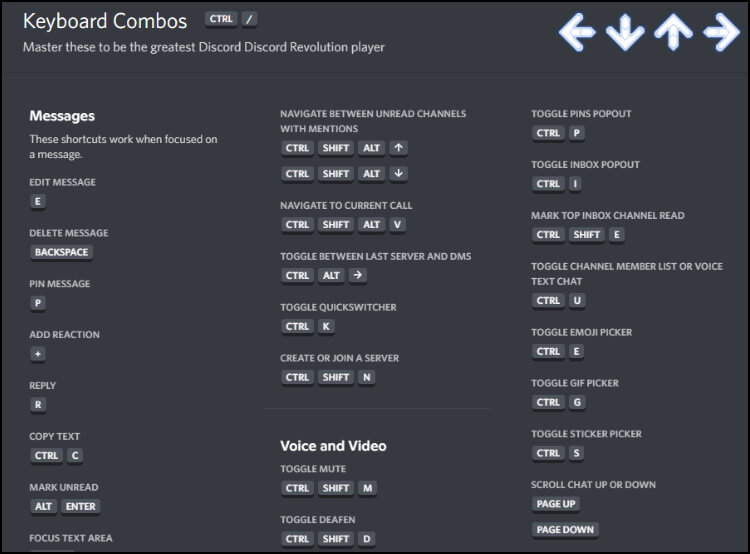
For example, if you want to search for a particular user or message on a server on Discord, press Ctrl + f, and then the search pane will appear in the upper right corner of the window.
In the keyboard shortcuts window, there is another cool trick that you must be familiar with – if you press the arrow keys on your keyboard, Discord will make sounds according to the keys you press. Give it a try, it’s cool.
Add status to profile
Want to send a message to friends who are on your Discord server or do you just want to register a cool status that everyone can see? You can do this using the status in your profile.
Click on your profile picture that appears in the lower right corner of the window. In the window that opens, click “Edit Custom Status”.
In the window that opens, 3 fields will appear: In the first field “WHAT’S COOKIN, username” enter the status. By the way, you can add emoji status by clicking on the emoji on the side of the panel.
In the middle field called “CLEAR AFTER”, you can set to Discord when you want it to automatically delete your status – after 30 minutes (30 minutes), 1 hour, 4 hours, 4 hours, today or not delete In general (Do not clear).
In the bottom field called “STATUS” you can select the desired status – Available (Online), Not at the computer (Idle), Please Do Not Disturb (Do Not Disturb), or Hidden / Invisible.
Click “Save” to save the changes.
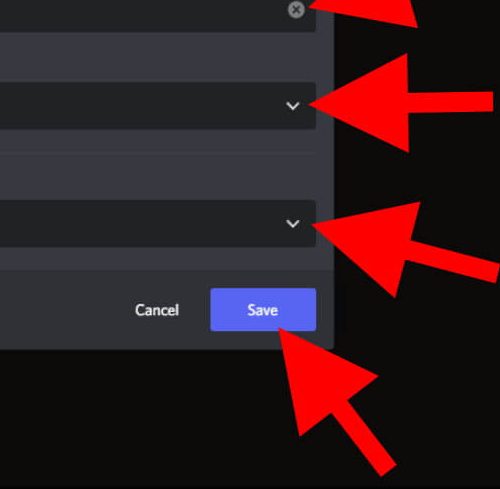
Now, all Discord users (and you too) will be able to see the status you added.
Folders for servers
Want to put some order in all the servers you are on? Discord allows you to create folders and insert server content. This way you can arrange the servers according to different categories and topics.
So how do you do that? Simply drag any server and place it on another server related to the same domain or topic. Next, Discord will create a folder in which the two servers will appear. You can put several servers in each such folder.
You can also rename a folder or rename it by clicking on the folder with the right mouse button. In the menu that opens, click on “Folder Settings” .
In the window that opens, in the “FOLDER NAME” field, type the name of the desired folder. You can also select a color for the folder by clicking on one of the colors listed under “FOLDER COLOR”. Click “Done” to save the changes.
Want to remove a specific server from the folder you created? Just dragged her out.
Connecting the Discord account to accounts on social networks
Do you have a YouTube channel? Want to be followed on Twitter or Facebook? Discord allows you to connect to your Discord account the accounts you have on the various social networks so that whoever views your profile, can see these accounts and maybe even follow you.
Click on the gear that appears in the lower right corner of the window.
In the window that opens, click on “Connections”.
In the center of the window will appear all the social networks and platforms that you can connect to your Discord account. Click on the desired platform and connect to your account via Discord.
Note: We want to address the issue of privacy and security, keep in mind that Discord will ask you for access to your name and profile picture and other details that appear in the account. So if this does not work for you, skip this tip.
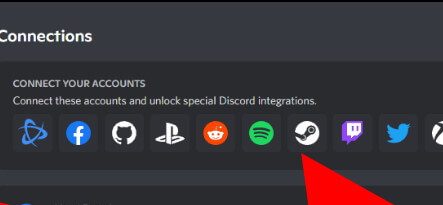
Once you log in to your account on the platform of your choice, the account will appear in your profile and everyone will be able to see it. There are certain platforms like Twitter, for example, that Discord will also add a direct link to your account on the same platform so that anyone who clicks on the link will get to your profile and can see what you are posting and even follow you.
Bonus – light or dark mode
We promised you 5 tips and tricks in the title, but it was hard for us to give up that tip. If you do not like working with a bright mode for some reason? Or if you prefer a dark theme? You should know that Discord allows you to switch from light mode to dark mode and vice versa.
Click on the gear that appears in the lower right corner of the window.
In the user settings window, in the menu that appears on the left side of the window, click on “Appearance”.
In the center of the window, under “THEME” select the desired mode – Dark, Light, or Sync with the computer. Selecting this mode will cause the discord to switch from light to dark mode and vice versa depending on the state of the operating system.




GIPHY App Key not set. Please check settings